

What is Selenium?
By its formal definition, "Selenium is a suite of tools for automating web browsers", and that is really what it is. While I think some people might have misunderstood it as a testing tool as I did at first, I've learned to see that Selenium is more of a general purpose tool that can be used for browser testing instead. In fact, any repetitive web-based task that you find yourself doing, you should make Selenium do it for you!
In fact, I have created a project myself, called Readminder, that helps me automate the process of searching the latest chapters and/or chapters where I left off for my favourite web comics and send me an email reminder for them. Check it out here!
Getting Started
Before we get started, there are three important steps in setting up Selenium:
1) Install the Selenium library for your desired programming language
Selenium currently supports up to 6 different programming languages: Java, Python, C# Ruby, JavaScript, and Kotlin. I've chosen Python here as it is the language known for automation/scripting and it is undeniably my favourite language :)
pip install selenium
2) Download a matching version for your browser driver
I'm choosing Chrome here since it's the most popular web browser.
First, make sure you are downloading the driver for the right version by going to chome://version
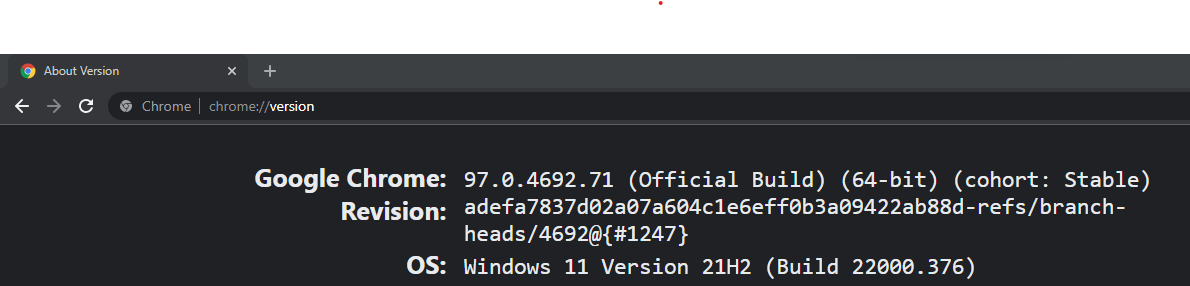
Here, you can see that the version I have is 97.0.4692.71, yours will probably be different. Don't worry if there's no exact matching version listed. Choose the version closest to it. Likely the one to choose is where the last 2 digits won't match and that is fine.
3) Set up the necessary path for the drivers
Depending on your system, it will look slightly different on how you add the location of your drivers to your PATH environment variable.
Bash
echo 'export PATH=$PATH:/path/to/driver' >> ~/.bashrc
source ~/.bashrc
Zsh
echo 'export PATH=$PATH:/path/to/driver' >> ~/.zshrc
source ~/.zshrc
Windows
setx PATH "%PATH%;C:\path\to\driver"
Once the above steps are done, you are now ready to start automating your browser!
Automating your Browsing Experience
Let's have a look at the 8 fundamental steps or actions you can take when automating the browser with Selenium.
Step 1: Start the session
driver = webdriver.Chrome()
Step 2: Take action on the browser
driver.get("http://www.google.com")
The most common web browser action you can take is navigating to a web page. In the above example, we are opening a web page with the URL http://www.google.com. Some other useful web browser actions include:
Other Browser Navigations
driver.back()    # Clicks the browser’s back button
driver.forward()    # Clicks the browser’s forward button
driver.refresh()    # Refreshes the current browser's page
Add or Delete Cookie
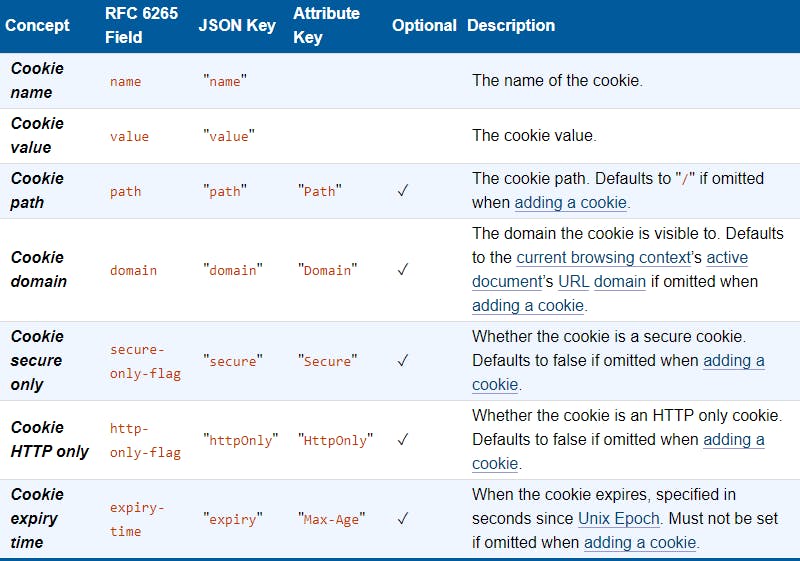
Cookies are useful for storing and loading user information. To add a cookie to the current browsing context, we can use the add_cookie function which accepts a cookie serializable JSON object.
driver.add_cookie({"name": "key", "value": "value"})
The table below describes the fields of a serialized cookie and whether it is optional when provided to add a cookie.
Working with Windows and Tabs
Every window and tab has what it's called window handle, which is used to uniquely identify it. To get the window handle of the current window or tab, we can use the following property:
driver.current_window_handle
When we create a new tab or window, the focus will be shifted onto the new window or tab on screen
driver.switch_to.new_window('tab')    # Switch to a new tab
driver.switch_to.new_window('window')    # Switch to a new window
To switch back to our original window, we can simply use a variable to store our original stored window handle and switch back to it.
original_window = driver.current_window_handle
# some window/tab switching logic...
driver.switch_to.window(original_window)
Finally, to close the current window or tab, we can call:
driver.close()
Step 3: Request browser information
driver.title          # get title
driver.current_url    # get current URL
There are a bunch of types of information about the browser you can request besides the title and current URL, including the following:
Cookies
If we had added a cookie before, we can get its details by its name through the get_cookie function like so:
driver.get_cookie("foo") # Get details of a cookie with the name 'foo'
Window Size
size = driver.get_window_size()
width = size.get("width")
height = size.get("height")
Window Postitions
position = driver.get_window_position()
x1 = position.get('x')
y1 = position.get('y')
Step 4: Establish Waiting Strategy
Generally, we want to establish a waiting strategy to interact with elements in the when it has been loaded and ready to be interacted. Let's look at the 2 types of waiting strategy.
Implicit Wait
driver.implicitly_wait(10)
The simplest strategy is the implicit wait strategy. It tells the WebDriver to poll or repeatedly check the DOM for a specified amount of time when trying to find element(s) and if they are found before this specified amount of time, then we continue without waiting out the full duration (10 seconds in our example above). This waiting strategy is mostly used to make sure that we wait until the element is ready if they are not immediately available.
Explicit Wait
from selenium.webdriver.support import expected_conditions as EC
wait = WebDriverWait(driver, timeout=10)
element = wait.until(EC.element_to_be_clickable((By.ID, 'someid')))
The explicit wait strategy comes in when you need more flexibility in defining exactly how long you want the WebDriver to wait. This wait strategy allows your code to halt program execution, or freeze the thread, until the condition you specify resolves. This means before the timeout (10 seconds in our example above) has elapsed, it will keep trying and waiting on the condition until it returns a true value.
Note that using implicit and explicit waiting strategies in conjunction can cause unpredictable wait times as implicit waits don't have a predefined wait time. For example, setting an implicit wait of 10 seconds and an explicit wait of 15 seconds could cause a timeout to occur after 20 seconds instead of 25.
Step 5: Find an element
from selenium.webdriver.common.by import By
search_box = driver.find_element(By.NAME, "q")
search_button = driver.find_element(By.NAME, "btnK")
Before interacting with an element, we have to first find the element. This search is done through specifying and filtering the desired elements' attribute. In the above example, we are filtering by the name attribute. Other attributes available for the By class are as follows:
ID = "id"
XPATH = "xpath"
LINK_TEXT = "link text"
PARTIAL_LINK_TEXT = "partial link text"
NAME = "name"
TAG_NAME = "tag name"
CLASS_NAME = "class name"
CSS_SELECTOR = "css selector"
There is also the
find_elements()method if you want to find more than one element by the specified attribute. This method will return the list of elements found.
Step 6: Take action on element
from selenium.webdriver.common.keys import Keys
search_box.clear()
search_box.send_keys("Selenium" + Keys.ENTER)
search_button.click()
There are 4 basic types of commands that can be executed on an element.
send_keys()
Types the provided keys into an editable element.
click()
A click command is executed on the center of the element.
clear()
Resets the content of an element.
select
There is a Select class to take actions on <select> elements easier. First, you create a Select object using a WebElement that references a <select> element.
from selenium.webdriver.support.select import Select
select_element = driver.find_element(By.ID, 'selectElementID')
select_object = Select(select_element)
Then use one of the following ways to select an option:
1. Select an <option> based upon the <select> element's internal index
select_object.select_by_index(1)
2. Select an <option> based upon its value attribute
select_object.select_by_value('value')
3. Select an <option> based upon its text
select_object.select_by_visible_text('text')
Or if you're just interested in what <option> elements the <select> element contains and which <option> elements are selected:
all_available_options = select_object.options
all_selected_options = select_object.all_selected_options
Step 7: Request element information
driver.find_element(By.NAME, "q").get_attribute("value")
Elements contain information that we can extract from. Notice in the above example how we directly locate the element and requesting the value attribute from it. Oftentimes, we need to relocate the element before requesting element information as the DOM has changed since we first locate it. Now, there are 4 common categories from which we can query element information:
1. Attributes and Properties
Using get_attribute and get_property methods, we can fetch our desired attributes and properties from an element.
link_text.get_attribute("href")
img.get_attribute("src")
search_input.get_property("value")
2. Text Content
text = driver.find_element(By.CSS_SELECTOR, "h1").text
3. CSS Value
cssValue = driver.find_element(By.LINK_TEXT, "See More").value_of_css_property('color')
4. States
isDisplayed = driver.find_element(By.ID, 'textLbl').is_displayed()
is_displayed checks if the element is visible or not.
isSelected = driver.find_element(By.CSS_SELECTOR, "input[type='checkbox']").is_selected()
is_selected checks if the element is selected or not.
isEnabled = driver.find_element(By.NAME, 'btnK').is_enabled()
is_enabled checks if the element is enabled or disabled.
These methods returns a boolean value. True if the check passes and False otherwise.
Step 8: End the session
driver.quit()
This quits the browser by default and the automation for this session ends.
And that's it! Using these 8 simple steps, you should be able to automate just about anything on your browser with Selenium in Python!
Hope this guide has been helpful and as always, thanks for reading!