In this tutorial, I will show how you can integrate Google Sheets API With Python Flask by building your own API that essentially does CRUD (Create, Read, Update and Delete) operations on your Google Sheet.
Initial Setup
Create a New Project on Google Cloud Console
Log into console.cloud.google.com and create a new project. After creating a new project, you should be automatically redirected to the main dashboard of your new project.
Then, navigate to APIs & Services > Library.
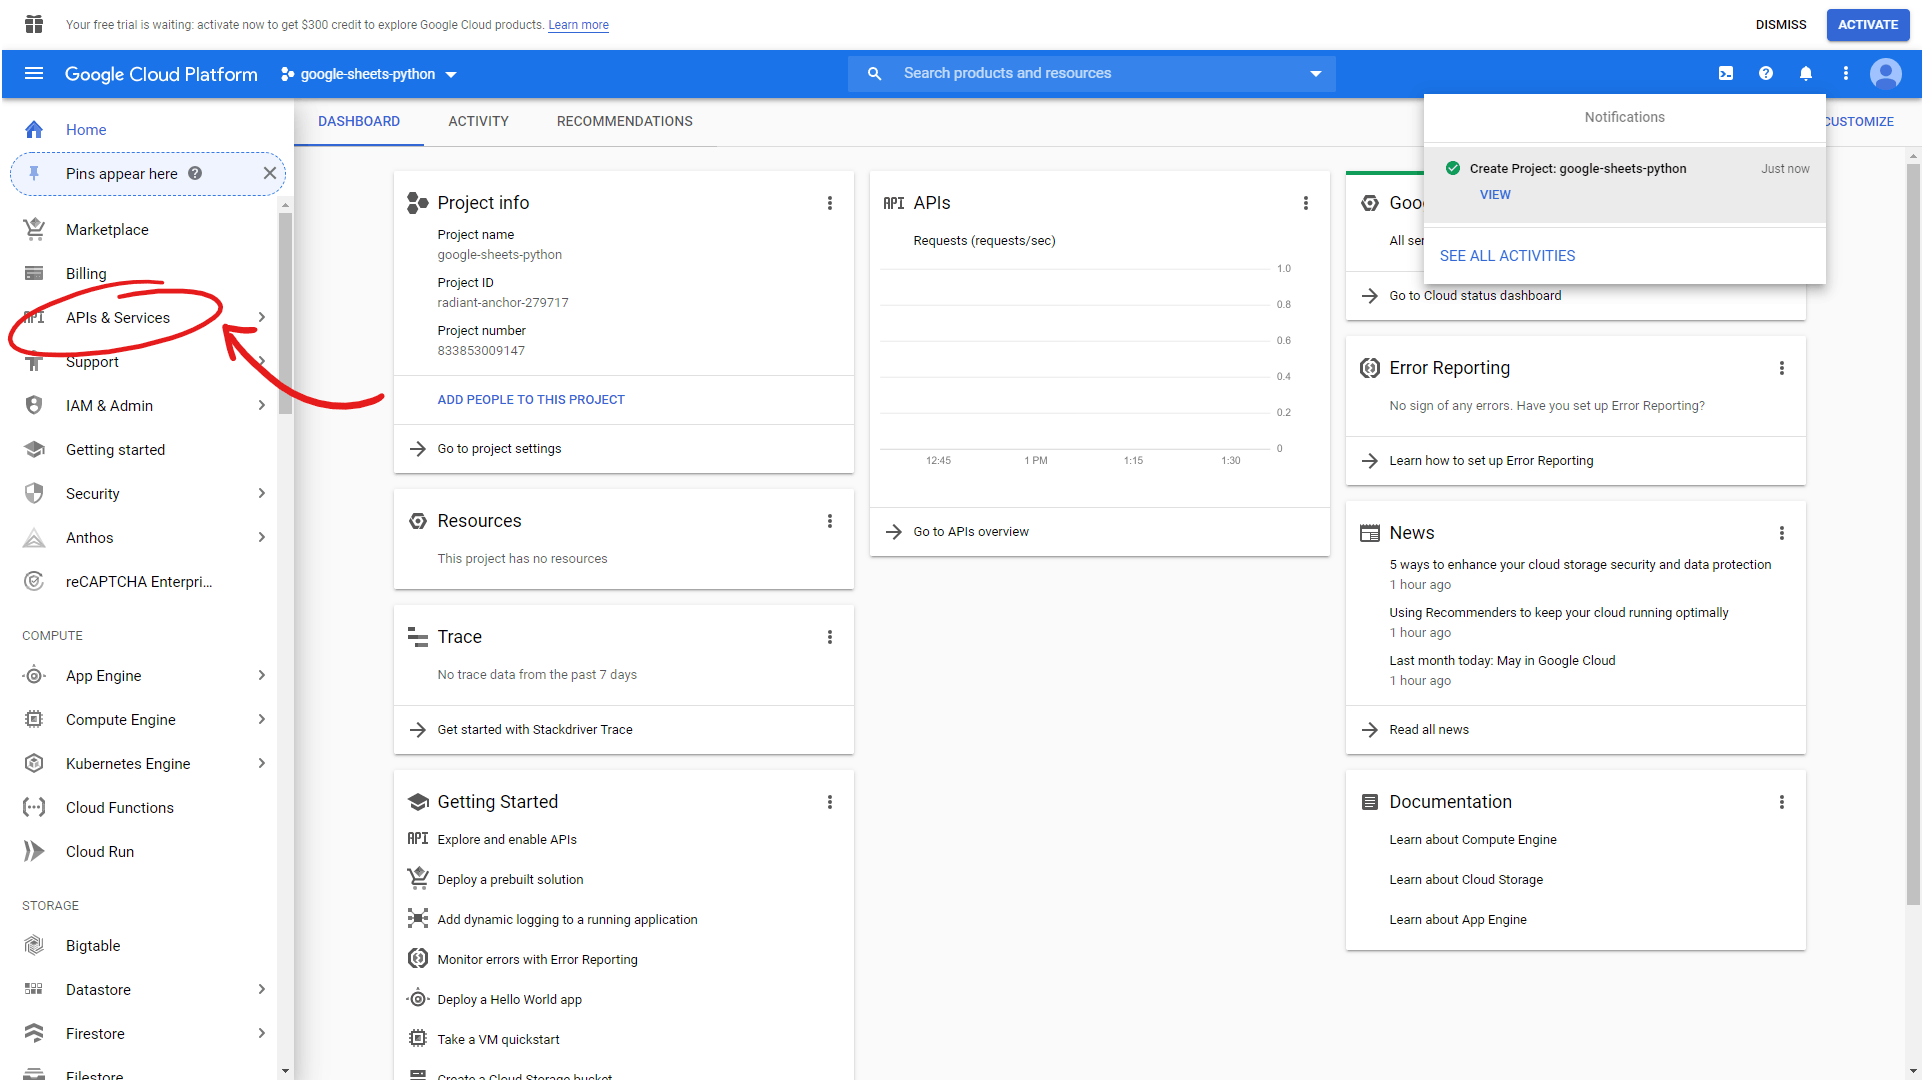
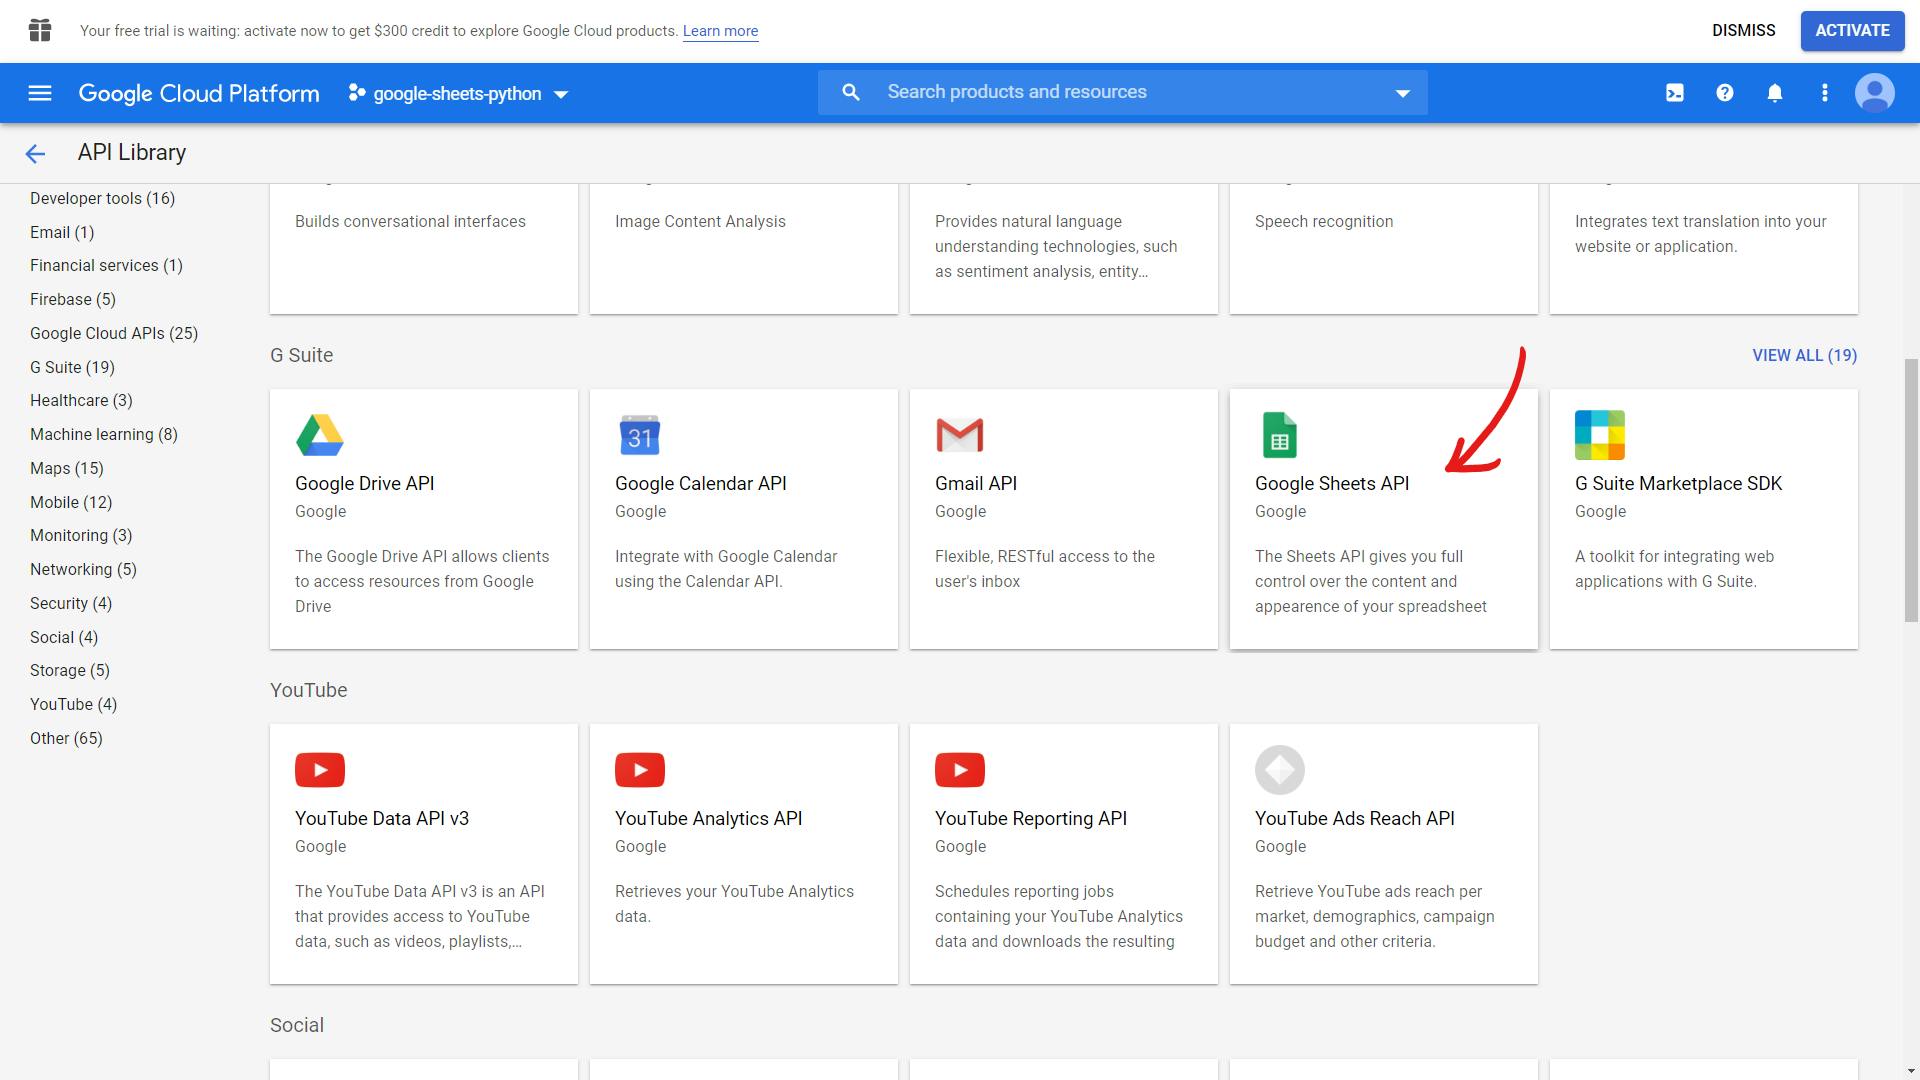
Scroll down to the G Suite section and click on the Google Drive API, then enable it.
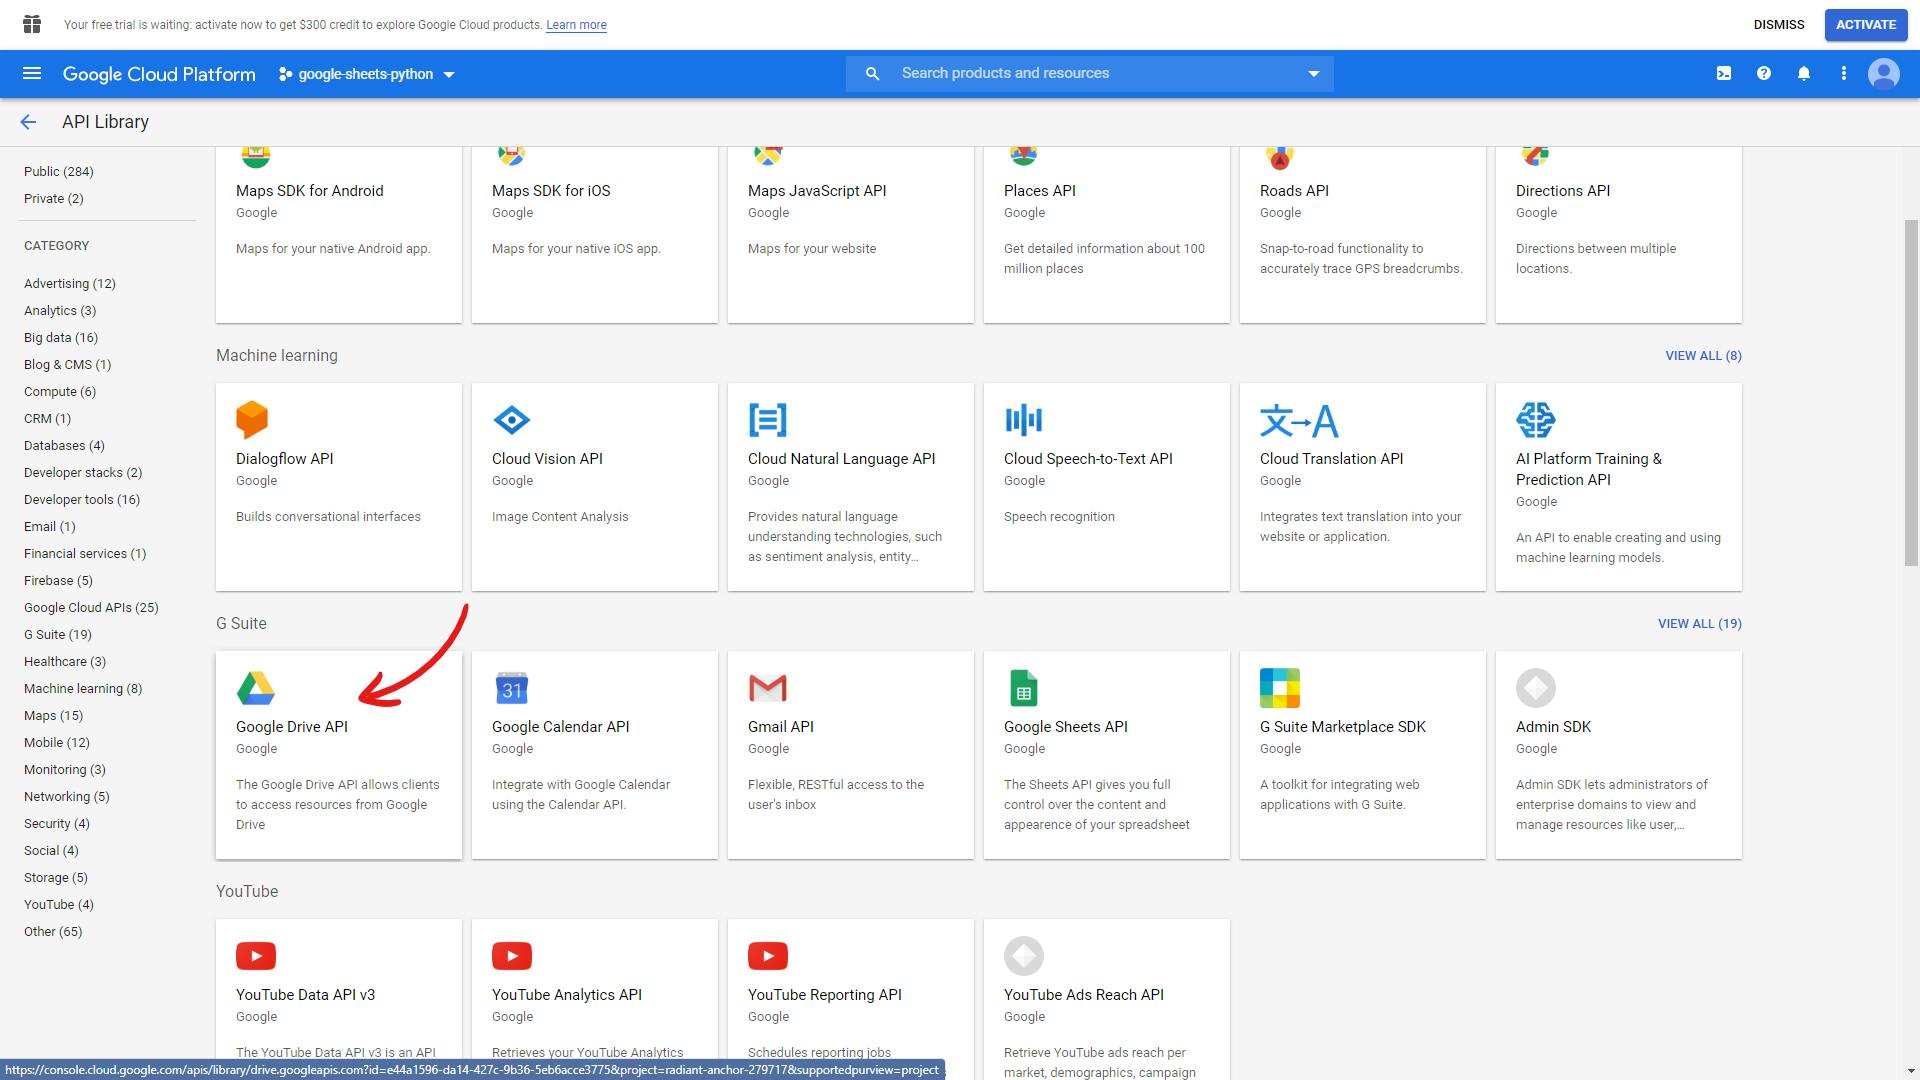
You'll then be redirected to the following page.
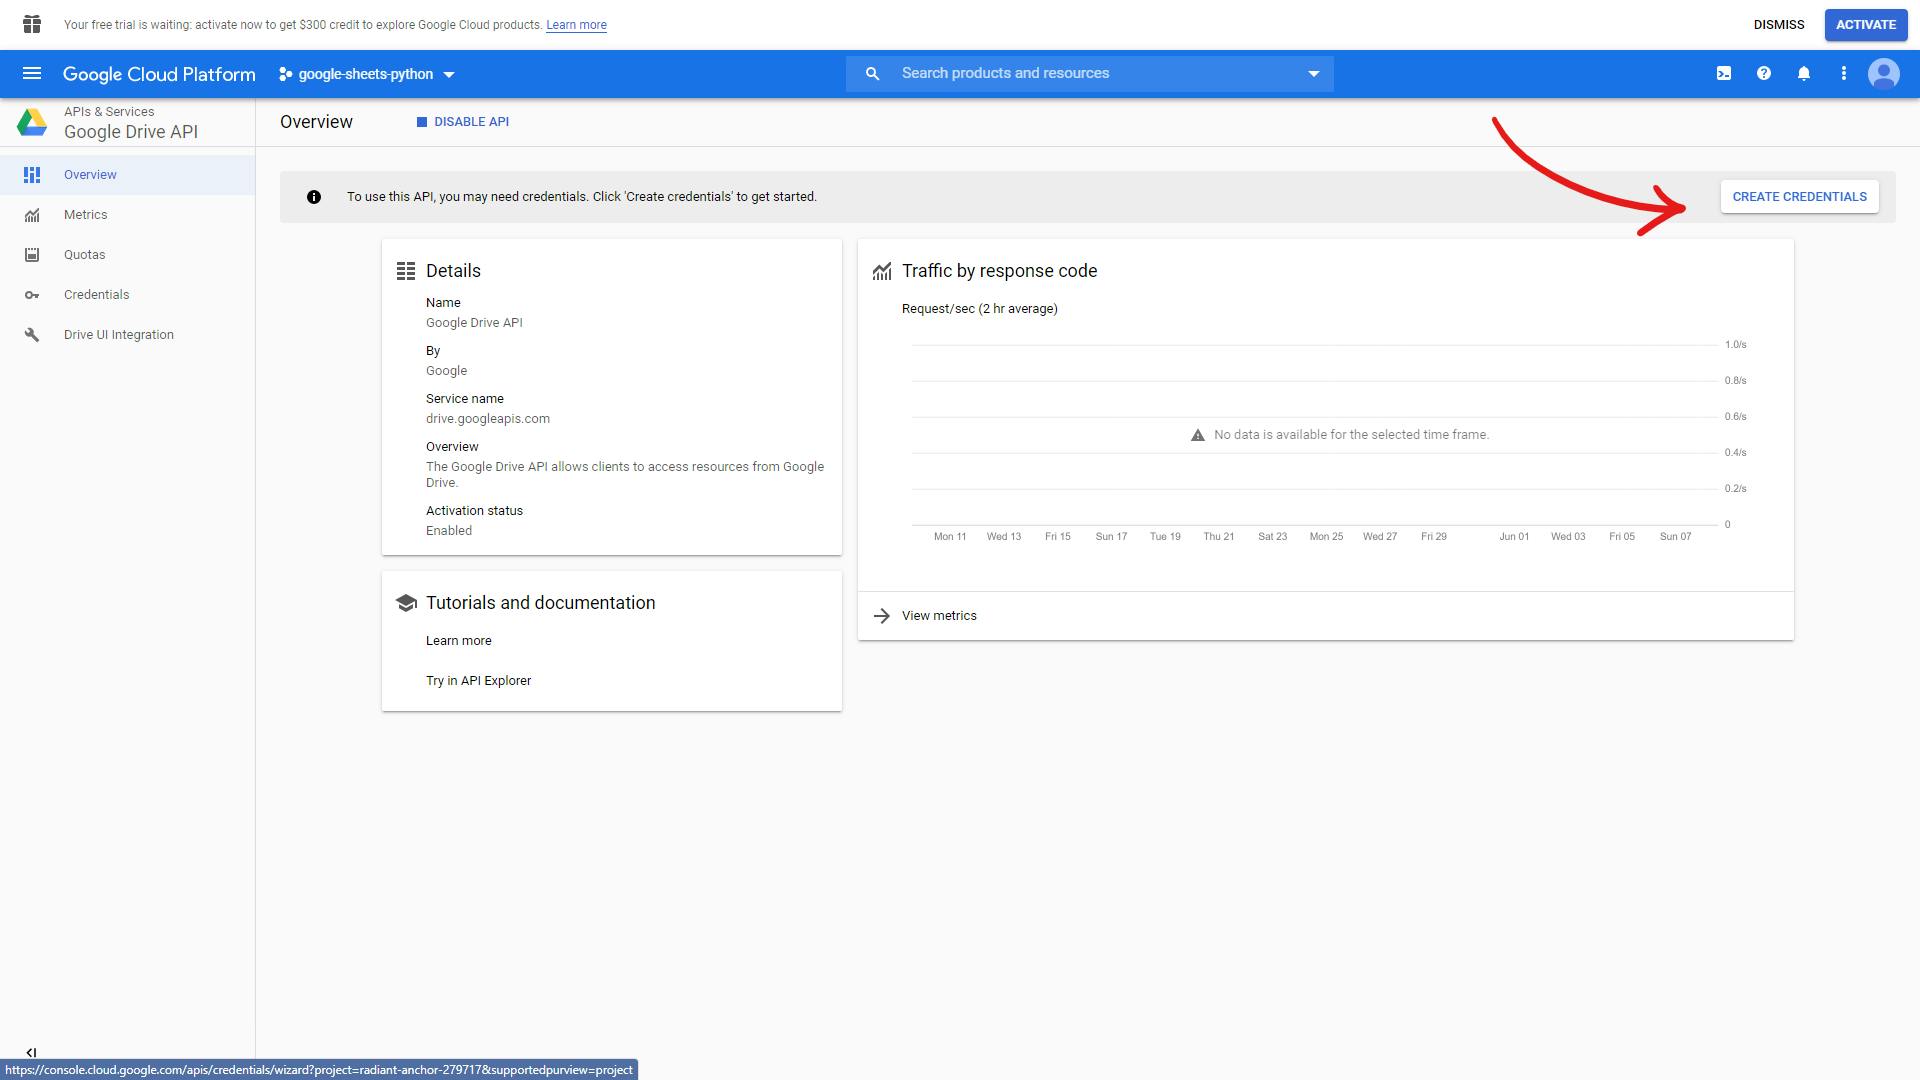
Click on "create credentials", and fill the form with the following details.
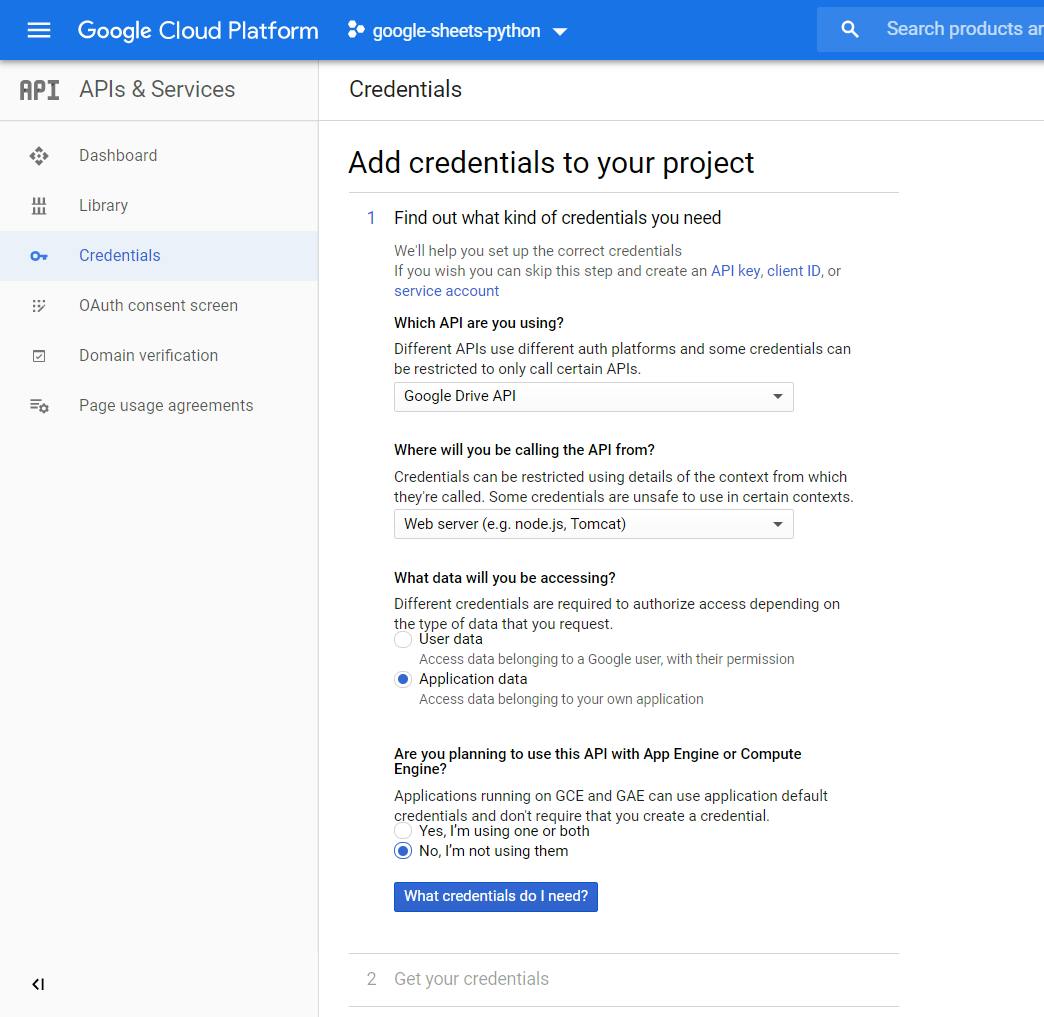
Replace service account name with a name you like.
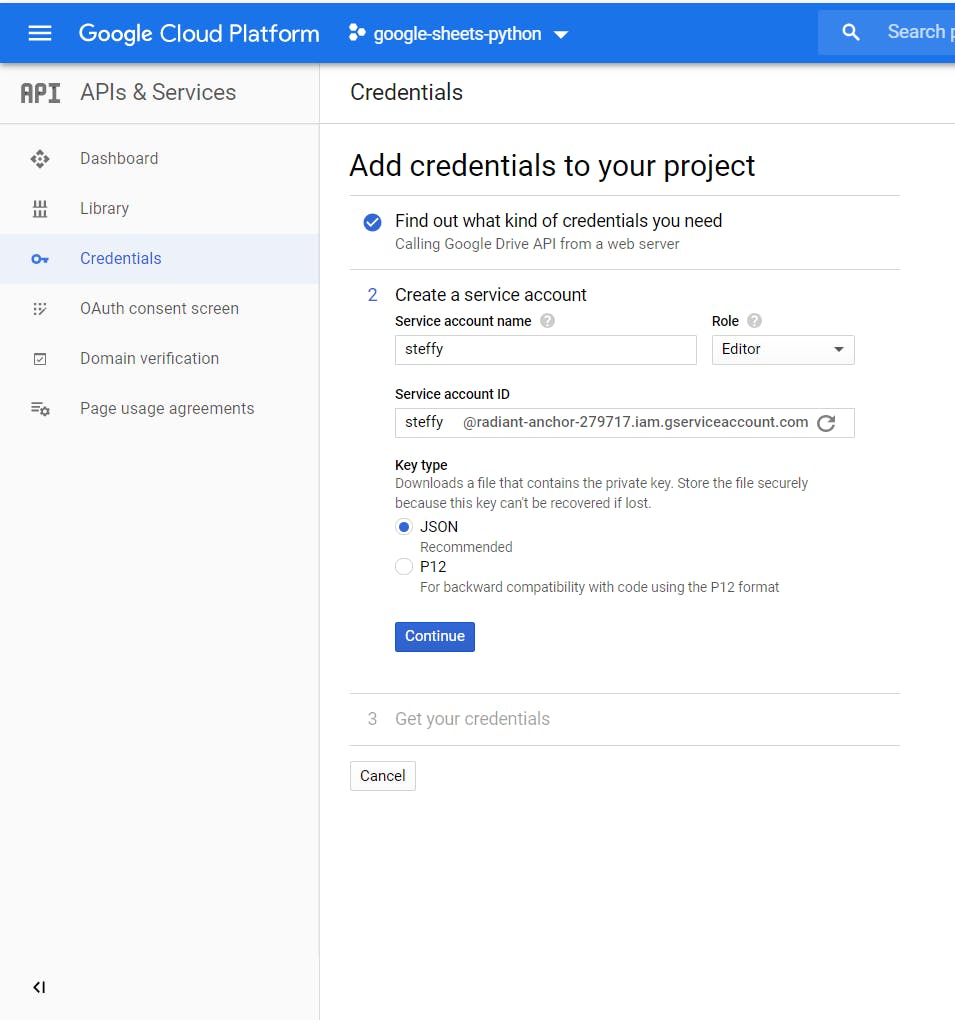
After clicking "continue", a JSON file containing your credentials should automatically be downloaded. The name of the JSON file is likely something complicated. For simplicity and consistency purposes when setting up our API later, rename the file to "credentials.json".
Finally, do the same for the Google Sheets API by searching for it in the G Suite section and enabling it. However, unlike the Google Drive API, there's no need to create any credentials.
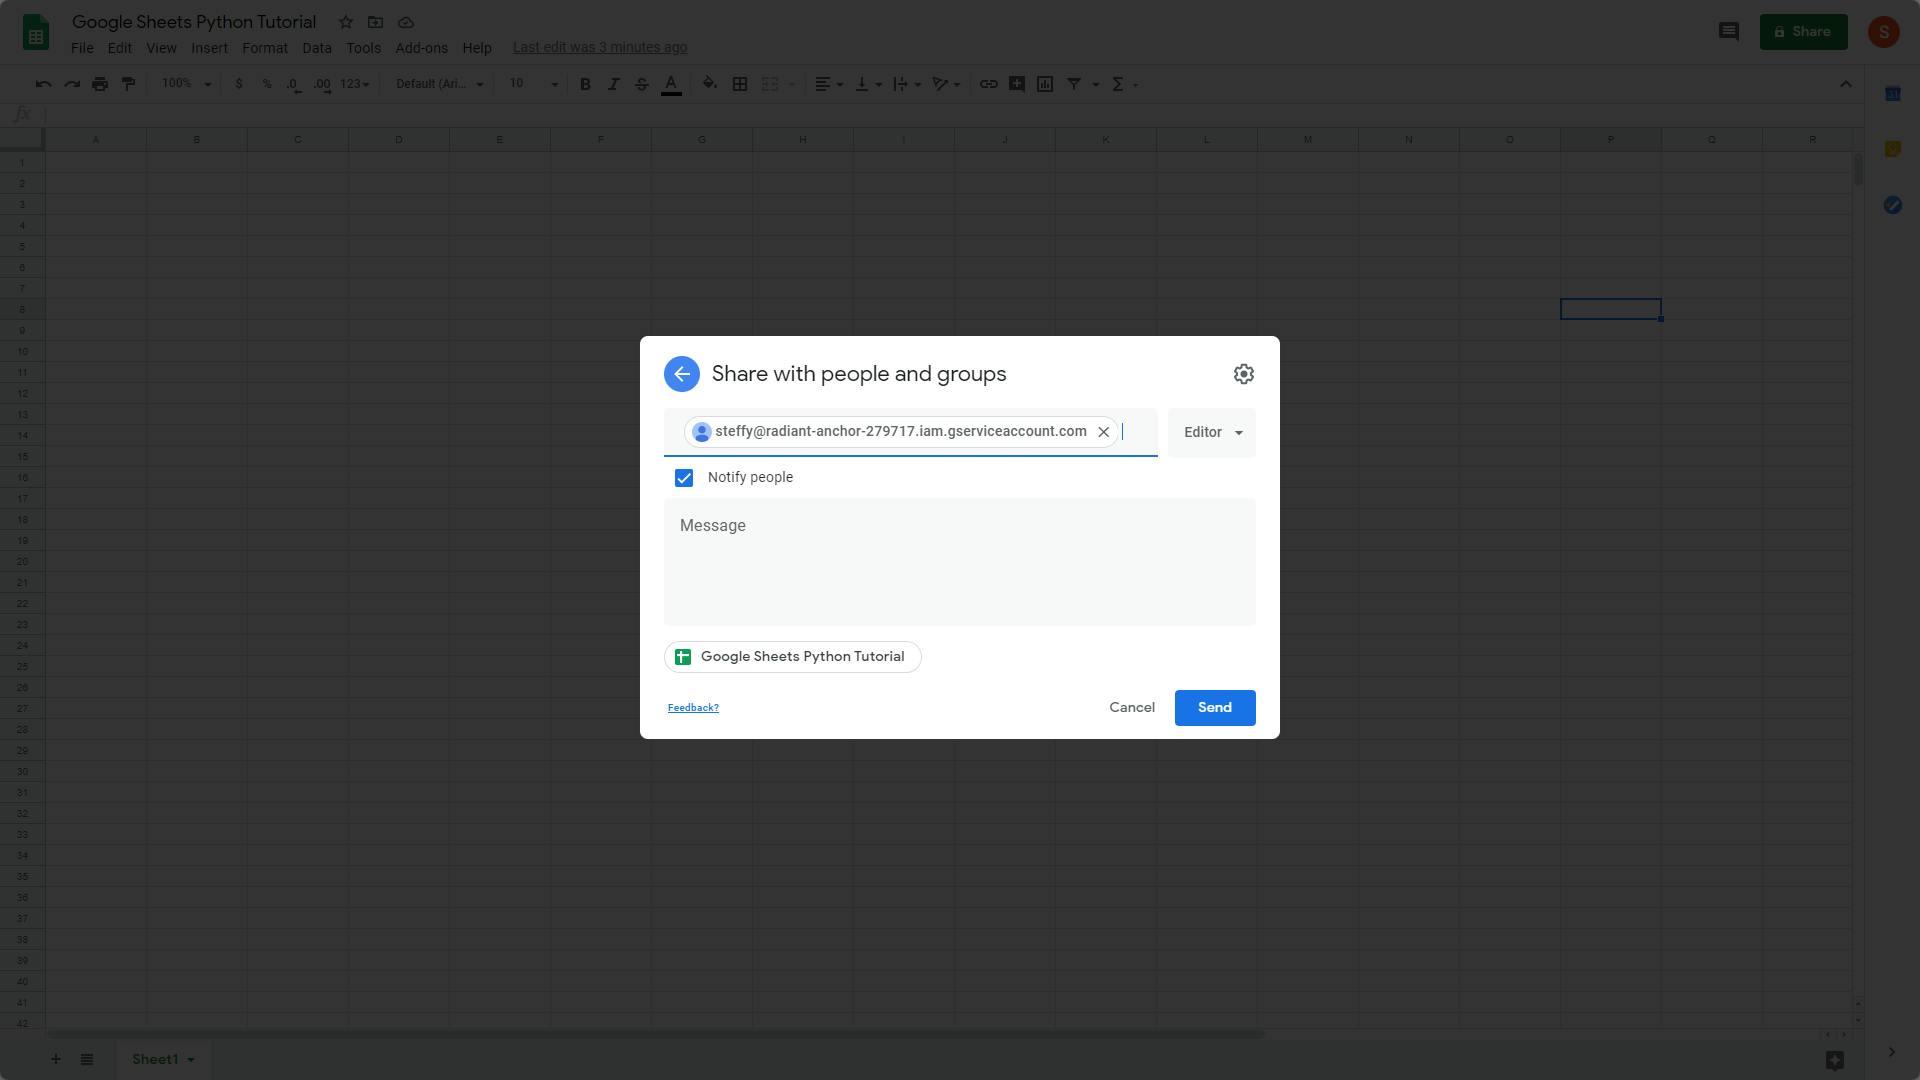
Now, open "credentials.json" with your favourite text editor and search for the client_email key. Copy the corresponding email address value and share the google sheet document with this email like so:
Python Project Setup
As usual with any python project, first create your virtual environment. For anyone who don't know what this mean, I recommend using the PyCharm IDE which you can download the community edition here for free. PyCharm will create the virtual environment automatically when you create a new project.
After creating a new project, initialize the project directory with a python file (you can name this anything you want but I'll go with app.py) and credentials.json (the downloaded JSON file which we have renamed).
Now, navigate to Settings > Project Interpreter and install the following modules:
- Flask
- gspread
- oauth2client
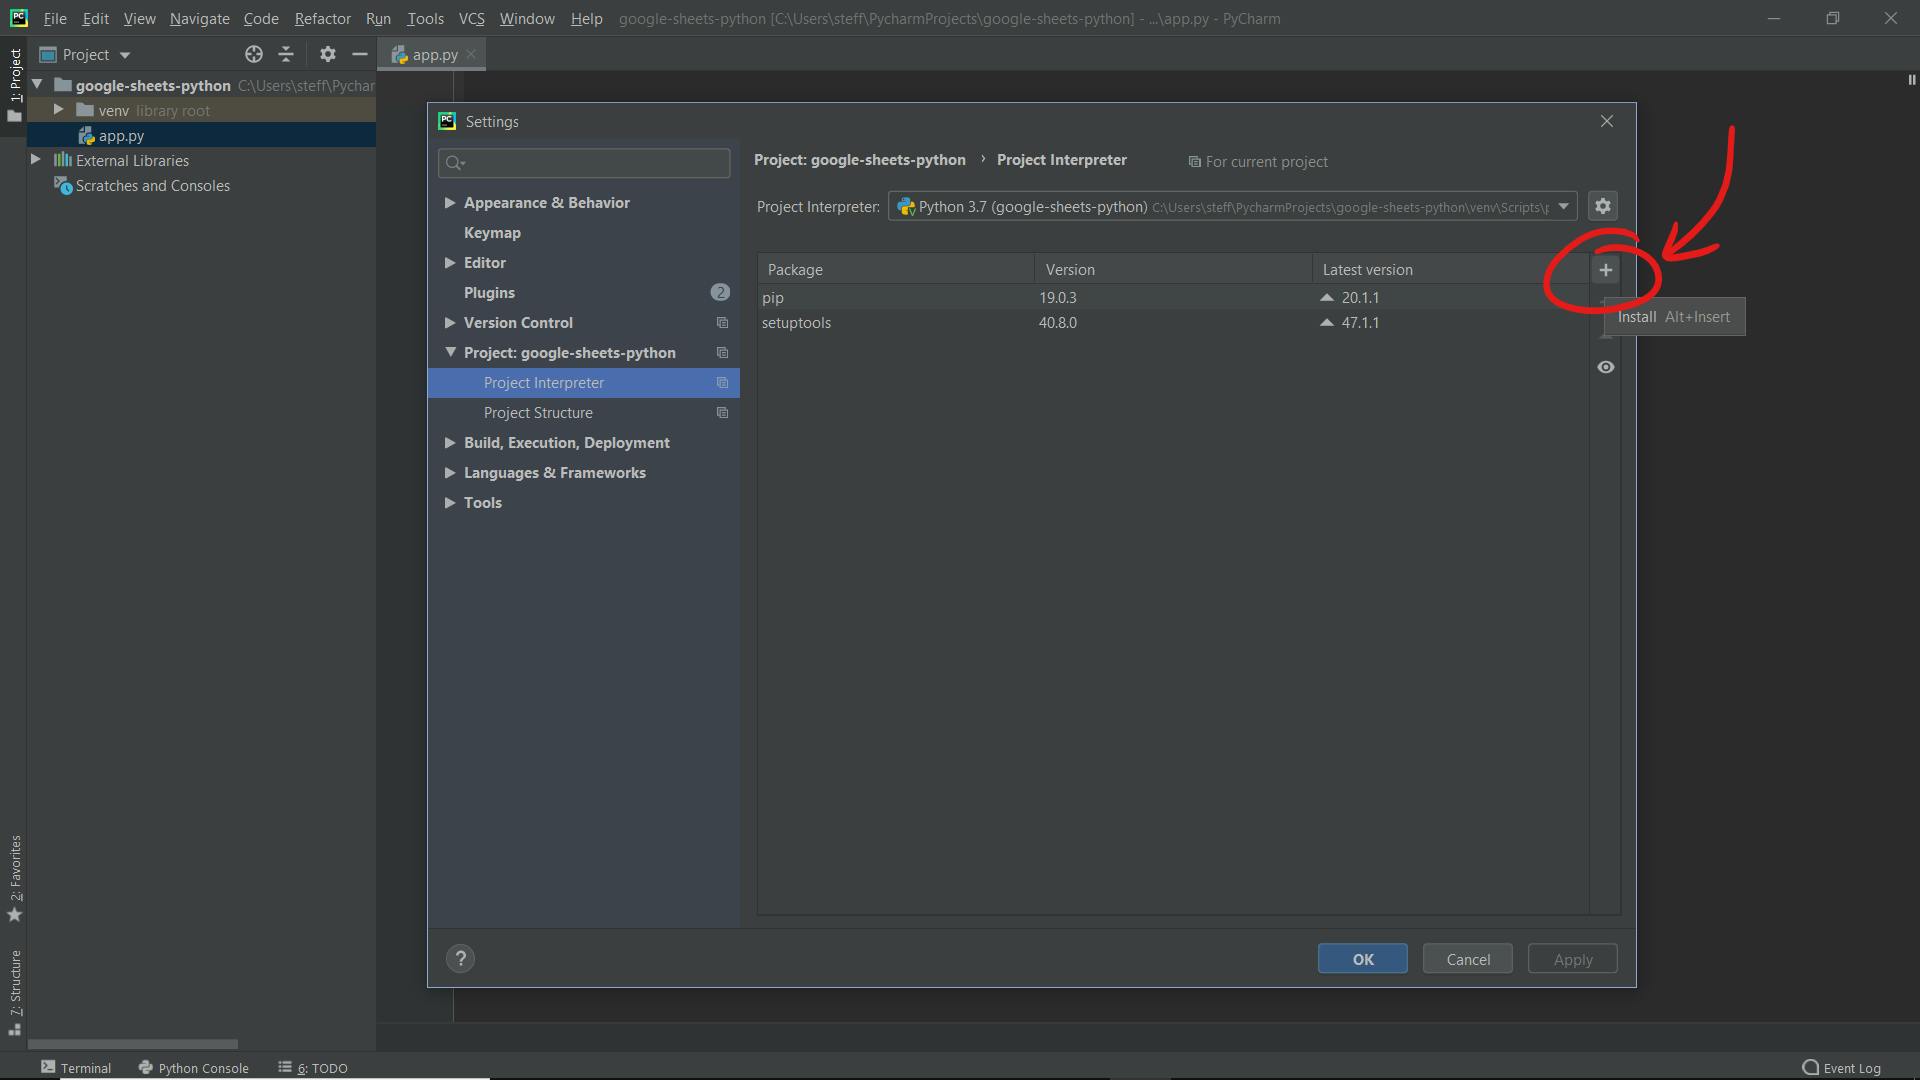
Alternatively, you can choose to pip install these modules if you prefer to.
After the modules are installed, we can finally start coding!
Building the API
First, let's import all of our installed modules.
# Flask Setup
import os
from flask import Flask, jsonify, request, abort
app = Flask(__name__)

# Google Sheets API Setup
import gspread
from oauth2client.service_account import ServiceAccountCredentials
Next, let's authorize ourselves to have access to the Google Sheet we want to modify from our API (replacing "Google Sheets Python Tutorial" with the name of your google sheet) by adding the following lines of code.
credential = ServiceAccountCredentials.from_json_keyfile_name("credentials.json",
                                                              ["https://spreadsheets.google.com/feeds",
                                                               "https://www.googleapis.com/auth/spreadsheets",
                                                               "https://www.googleapis.com/auth/drive.file",
                                                               "https://www.googleapis.com/auth/drive"])

client = gspread.authorize(credential)
gsheet = client.open("Google Sheets Python Tutorial").sheet1
And now, we're reading to build our API routes. In this example, I've initialized my google sheet to have a header row as follows:
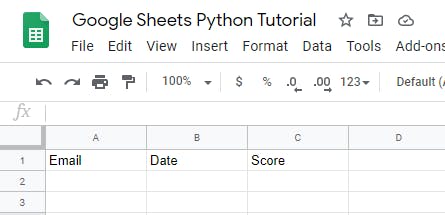
Basically, it is a table that will display emails representing each user giving a review score on a specific date. Obviously, you don't have to follow my example exactly. My example is just for illustration purpose.
GET Route
If we want to get all the data from our sheet, then we can just call gsheet.get_all_records() and a GET method can be implemented as follows.
# An example GET Route to get all reviews
@app.route('/all_reviews', methods=["GET"])
def all_reviews():
    return jsonify(gsheet.get_all_records())
POST Route
If we want to add an entry of data, then we can call the insert_row() function that accepts two parameters: a list representing the row data you want to insert and the row number where you want to insert the data respectively. Note: row number is not based on zero indexing meaning the header row is index 1, and so if you want to insert a row after the header row, the row_number will be 2
# An example POST Route to add a review
@app.route('/add_review', methods=["POST"])
def add_review():
    req = request.get_json()
    row = [req["email"], req["date"], req["score"]]
    gsheet.insert_row(row, 2)  # since the first row is our title header
    return jsonify(gsheet.get_all_records())
DELETE Route
If we want to delete an entry, then we can call the delete_row function that takes in a single parameter: the row number.
# An example DELETE Route to delete a review
@app.route('/del_review/<email>', methods=["DELETE"])
def del_review(email):
    cells = gsheet.findall(str(email))
    for c in cells:
        gsheet.delete_row(c.row)
    return jsonify(gsheet.get_all_records())
PATCH Route
If we want to modify an entry, we can call the update_cell function that takes in three parameters: the row number, the column number, and the data we want to update with respectively. The first two parameters acts like coordinates in a 2D plane that specifies which cell in the table we want to update.
# An example PATCH Route to update a review
@app.route('/update_review', methods=["PATCH"])
def update_review():
    req = request.get_json()
    cells = gsheet.findall(req["email"])
    for c in cells:
        gsheet.update_cell(c.row, 3, req["score"])
    return jsonify(gsheet.get_all_records())
Wrapping Up
To make our API work, we will need it to listen somewhere when it runs. To do this, we can append the following lines of code.
if __name__ == "__main__":
    app.run(host='0.0.0.0', debug=False, port=os.environ.get('PORT', 80))
And that's it! You now have a fully working API that can modify Google Sheets through HTTP requests! Obviously, there's more that you can do with the Google Sheets API which you can read more here, but I think this is a good start.
If you enjoyed this article, don't forget to leave a like and thanks for reading!
